


A friend in Canada uses a “syringe” with his corner finishers. He says it’s better than a corner applicator because it holds a lot more compound. Does TapeTech make a syringe?
The syringe does, in fact, hold significantly more compound than a corner applicator but it operates the same way as a standard applicator; requiring manual force to push the compound out of the syringe. Your friend also needs to literally suck the compound out of the bucket with the syringe which is a very manual process that requires the removal of the corner finisher whenever it’s time to refill the tool. TapeTech took this concept a giant leap forward with the MudRunner®, making corner finishing easier than ever. The MudRunner® operates with a simple twist of the wrist to effortlessly apply compound to inside and outside corners with corner finishers or mud heads. The MudRunner® holds 50% more compound than a standard 8” corner applicator and 70% more than a 7” applicator.Are the Continuous Flow Boxes the same capacity as standard Finishing Boxes?
Since the continuous flow pump maintains a constant flow of joint compound, the continuous flow finishing boxes have a smaller profile and less capacity than the standard Flat Boxes because their primary purpose is simply to deliver the joint compound to the wall. These finishing boxes don't need to "store" compound the way standard finishing boxes do. This makes continuous flow finishing boxes lighter and easier to handle than standard ATF boxes.Are the Premium Finishing Knives covered under TapeTech’s warranty?
The Premium Finishing Knives, like all TapeTech Tools, are warranted against defects in parts and workmanship.Are there any tips or tricks to make it easier to fill my TapeTech MudRunner®?
When filling the MudRunner®, we recommend that you first make sure that the filler nozzle on the tool is clear of any dry joint compound or other debris. Then firmly press the filler nozzle of the tool all the way into the filler adapter on the joint compound loading pump. As you fill the tool, the joint compound forces the hydraulic cylinder down – be sure to hold the tool securely in the filler adapter or it may “push” itself off from the pressure. Make sure that your joint compound is mixed according to the manufacturer’s specifications. Add a small amount of water if the mix seems too thick or is difficult to pump into the MudRunner®. Finally, after cleaning the MudRunner® each time, lubricate the Rod Wiper with Ames Bazooka Oil. Proper cleaning and maintenance, along with this basic technique described above, will make filling your TapeTech MudRunner® easier.Are there replacement parts for the semi-automatic tools?
Yes. You can visit us online at tapetech.com to view schematics that will show all replacement parts with their associated part numbers for easy ordering.Are these Premium Finishing Knives suitable to skim textured walls?
Yes. You can either apply the material manually with a paint roller or spray on then smooth out with the Premium Finishing Knives for an excellent finish.Can I adjust the skids on my Flusher?
Yes. Simply loosen the screws on the reverse side of the skid, move the skid to desired location and then tighten the screw.Can I adjust the spring pressure on my TapeTech Power Assist™ Finishing Boxes?
Yes. There are three adjustments that can be set on the Power Assist™ arm that connects the spring to the radius plate of the TapeTech Power Assist™ Finishing Box. The Power Assist™ boxes are factory set on the second setting of the Power Assist™ arm. To increase spring pressure, move the spring up to the top of the arm. To decrease pressure, move the spring to the bottom setting of the arm.Can I use commercial lubricants like WD-40 on my TapeTech tools?
There are many commercially available lubricant products on the market. Most are designed for specific uses. Our experience is that many lubricants can cause some of the rubber parts used in ATF tools to swell, making the tools operate less effectively. We recommend using Ames Bazooka Oil when lubricating your TapeTech Automatic Taping and Finishing Tools.Can I use FibaFuse or fiberglass mesh tape in the Automatic Taper?
FibaFuse will go through the taper. Fiberglass mesh tapes will NOT go through the taper.Can I use my MudRunner® to apply joint compound to outside corners when I’m applying paper-faced corner bead?
Yes! Applying joint compound to outside corners is easy using the TapeTech 14TT MudRunner® together with the TapeTech 16TT 90oOutside Corner Mud Head! Simply attach the Mud Head to your MudRunner® and apply joint compound directly to the outside corners! The Mud Heads produce a level, consistent layer of joint compound that is ideal for setting paper-faced corner bead. We recommend that you also use the TapeTech 17TT Outside Corner Roller to properly embed the tape on the outside corner.Can I use my Nail Spotter to touch up my drywall finishing work?
Yes! The TapeTech 63TT and 68TT Nail Spotters can be used to touch up all aspects of your drywall finishing! Its light weight and ease of use make it a perfect tool to correct any small areas that may have been missed or were accidentally damaged between coats. Internal corners, external corners, flats and butt joints in drywall can all be touched up using the Nail Spotter. For touching up standard height ceilings, the HN handle that is included with both models works perfectly. For higher ceilings, you may need to use the HNRE extendable Nail Spotter handle (not included with standard purchase).Can I use quick setting joint compound with my Bazooka Continuous Flow System?
Quick setting joint compounds (hot mud) cannot be used with the Bazooka Continuous Flow System. Only air drying powder or air drying ready mixed joint compounds can be used with the Bazooka Continuous Flow System.Can I use the Automatic Taper Extension (ATX01TT) on the Mini-Taper (03TT)?
No, the ATX01TT Taper Extension will not attach to the 03TT Mini-Taper. The extension is designed for the 07TT. The ATX01TT Extension attaches to the control tube of the 07TT and requires the length/distance that the 07TT tube provides. The distance from the bottom of the taper to the control tube of the 03TT Taper is insufficient for the ATX01TT to attach.Can I use the Compound Tubes to apply joint compound to outside corners for paper-faced bead installation?
The Compound Tubes are an excellent tool for applying joint compound to the outside corners when installing paper faced bead. Simply add the TapeTech Outside Applicator Head (sold separately) to the Compound Tube to apply a uniform layer of material for this application.Can I use the Premium Finishing Knives for Venetian plaster?
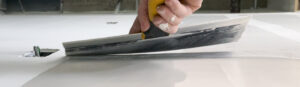
Yes, the 7" and 10" knives work well for Venetian Plaster applications. The ergonomic grip makes the application easy!Can I use these Premium Finishing Knives for finishing angles?
The smallest knife size offered is 7" and generally would be too large to finish angles however it works great when touching up angles after using the TapeTech Corner Finishing System.Can I use these Premium Finishing Knives when doing a level five finish?
These knives work great with level five applications! The blade has more contact with the wall creating a superior finish. The larger size knives will cover more wall space in less time so you can finish faster.Can the pump run more than one tool at the same time?
The BAZOOKA Continuous Flow system is designed to run one tool at a time. However, the system can fill standard automatic taping and finishing tools at the same time the pump is running a continuous flow tool.Can you set a corner finisher / flusher head to leave on less material?
TapeTech has two different tool categories for finishing internal corners. Corner Flushers and Corner Finishers If you have what TapeTech refers to as a corner flusher, there is no way to adjust the amount of joint compound the tool leaves in the corner. However, our Adjustable Corner Finishers, models 48TT and 48XTT, have adjustment arms on the back of the tool that allow you to increase or decrease the amount of pressure, thereby allowing you to leave more or less compound on one side, or both sides, of an internal corner. Models 40TT, 42TT and 45TT Corner Finishers do not have adjustment arms.Do I need a gasket when I put the gooseneck onto the B74TT pump?
No. The B89TT gooseneck is designed to fit the B74TT Bazooka pump without the need for gaskets or tools. This makes switching between the filler adapter and the gooseneck extremely fast compared to standard drywall compound pumps and saves money since you don’t need to purchase gaskets.Do I need to spray oil on my semi-automatic tools?
Minimal lubrication is needed for the semi automatic tools. Simply apply a small amount to the piston (rubber) of the compound tube.Do the TapeTech Cases hold the MAXXBOX?
No. The current TTCTAP and TTCFIN cases do not hold the MAXXBOX Extra High Capacity Finishing Boxes. They hold all other TapeTech finishing boxes and most finishing boxes from other brands of tools. We are developing a new case that will hold the MAXXBOX.Do the TapeTech Tool Cases hold the MudRunner?
No. The TTCTAP and TTCFIN Tool cases hold all the other tools but they do not hold the MudRunner.Does TapeTech make an extension handle for the corner applicator?
Yes! TapeTech offers the most heavy duty extension handles in the industry. We offer the 88TTA heavy duty extension corner applicator extension handle for the model 35TT or 50TT corner applicator. This handle can also be used with corner applicators from some other brands.Does the 76TT Pump need a paper gasket like the 72TT?
No. The TapeTech 76TT Loading Pump is designed with an integrated rubber gasket that eliminates the need for the old paper gasket. This feature saves you time and money!Does the Bazooka Continuous Flow Auto Taper weigh less than my regular Bazooka taper?
Absolutely. The Bazooka Continuous Flow Bazooka Taper T05CF weighs just 7 pounds, including a 250’ roll of tape! Compare this to a standard automatic taper that weighs approximately 18 pounds when fully loaded with joint compound and tape. The key difference is that the Continuous Flow Taper does not need to hold a reserve of joint compound; the joint compound flows continuously through the taper handle and onto the wall as you work. The taper handle is also smaller in diameter and more comfortable to operate for longer periods of time. Comfort, lower weight and no need to stop and refill constantly – continuous flow is a great solution for high production drywall finishing!How can I adjust the brake on my TapeTech XTender Box Handle?
Whether you've been using your TapeTech extendable box handle for years or you like to set the brake on your new box handles "just right", adjusting the brake on your TapeTech 88TTE XTender handle is easy. First, loosen the lock nut located near the top connector plate. Then adjust the set screw, using a hex wrench, to reach the desired action. Be careful not to tighten the screw too much as this can cause the brake to drag. Finally, tighten the lock nut again and you're ready to go!How do I change the cable on my automatic taper?
Please refer to the Operations Guide for the 07TT TapeTech automatic taper.How do I clean the compound tube?
Basic cleaning can be done by pulling back the plunger to fill the tube with water and then push out the water. Repeat this step several times. The compound tube can also be thoroughly cleaned by releasing the nose cone clips and the plunger clips. Remove these parts and clean with water and brush.How do I fill my Power Assist™ Finishing Box?
To fill the TapeTech Power Assist™ Finishing Boxes with joint compound, pull the pressure plate out to the fully open position. The pressure plate will catch in the toothed prawl (#212088) and be held there. There is a lock (#212087) mounted on the right side of the pressure plate that will secure the tool in the fill position. The finishing box can now be loaded with joint compound using the filler adapter and the loading pump. Watch a video of loading compound into finishing boxes here.How do I fill the Compound Tubes?
There are two options to fill the Compound Tubes. Option, 1 - Simply place the ball outlet into the bucket of joint compound and pull back on the plunger handle to fill the tube. Option 2 - You can use a standard loading pump with a Goosneck Adapter to fill the Compound Tube.How do I prevent the tape from jamming on my automatic taper?
The jamming of the tape is most likely caused by some type of obstruction within the tape guide itself or at the pyramid blade area. Keep the tape guide area clean with water and a brush and be sure to lubricate with Ames Bazooka Oil. If there is a tape jam at the pyramid blade, simply release the blade spring (#050132F) and pull the blade and chain through the taper head. Then use a piece of thin metal band or strap to clean or remove any obstruction that is located in the tape guide or pyramid blade area of the taper head. Pull the blade chain back through the taper head and reattach the spring using the Key Ring (#059067). View the Schematic Drawings for the Automatic TapersHow do I stop mud from leaking out of the filler tube of my corner applicator?
If joint compound is leaking back out of the filler, check to be sure there is no dry joint compound or debris preventing the filler from completely closing and sealing. Thoroughly wash the filler with clean water and check the spring on the filler assembly.How do you use the the Premium Finishing Knives with a mud pan?
The smaller knives (7" - 18") can be used with a mud pan to both apply and wipe off excess material. To use these smaller size knives with a mud pan, simply pull the material out of the pan and apply. Cleaning or wiping the knives is easy! Wipe off the material edge of the knife on the inside of the mud pan. The larger knives (24"+) will generally not work well with mud pans as there are not many mud pans larger than 24" in size. For these sizes, you will need to clear your knife with another knife into your bucket or separate pan.How much tape can the taper apply before it has to be refilled?
The TapeTech Automatic Tapers (07TT, 04TT and 05TT) can simultaneously apply 78’ (24 meters) of drywall joint tape and joint compound to flat, butt or internal corner joints before needing to be refilled.I just finished a large job with my Bazooka Continuous Flow System and will not be using it again for one month. How should I maintain the pump during this time?
As with all ATF tools, we recommend that you always keep the tools clean. For the BAZOOKA Continuous Flow pump, you should thoroughly clean out the hopper, pump and hoses by pumping water through them. For more information, see Page 14 of the Graco Pump Operating Manual. It's also recommended that you add Graco Pump Armor to the pump when storing the pump.I think I pumped air into my MudRunner® while I was filling it. Will this damage the tool?
Pumping air into the TapeTech MudRunner®, or any other automatic taping and finishing tool, usually results from either not properly priming the pump or from pumping joint compound from a bucket that is almost empty. If you happen to pump air into the MudRunner®, it will not damage the tool in any way. When you operate the tool, however, there will be a section of the internal or external corner that has less joint compound applied as the air is forced out of the tool. To prevent this, always prime the pump to release any air pockets and maintain a minimum level of joint compound in the bucket; about 3”- 4” is generally sufficient.If I damage the blade on a Premium Finishing Knife, can I replace the part?
No, the blade cannot be replaced as it is manufactured into the handle grip.If I decide to purchase fully automatic tools, can I use my flushers on those tools?
Yes. You can use the Flushers to wipe out the angle tape that has been applied with the automatic taper. Most finishers will still use the Corner Roller to embed the tape but you can also purchase the Corner Flusher Creaser Wheel Kit which can be installed onto the Flusher.If I have to use another knife to wipe the blade of the Premium Finishing Knife, doesn’t using these knives make me take longer to complete a job?
If you are using the knives to wipe down behind automatic taping and finishing tools, very little material is removed and a smaller knife can be used with a mud pan. If you are using the knives to finish by hand, using an additional small knife to wipe excess material will not require additional time to complete the job.If I were to “knick” my Premium Finishing Knife blade on a screw, can I sand this out with a piece of sandpaper or sanding sponge?
A very small spot can possibly be sanded out however our best advice is to carefully check your fasteners prior to coating with joint compound to avoid this problem.Is it necessary to have a paper gasket between the Filler Adapter or Gooseneck and the Loading Pump?
If you are using either the TapeTech 76TT or the 73TT EasyClean Loading Pump, it is necessary to use a gasket (part #700049) to provide a good seal between the 90T Filler Adapter or the 85T Gooseneck and the Loading Pump head. It's a good idea to keep a supply of gaskets on hand to prevent downtime. If you use the B74TT or B75TT Loading Pumps, there is no gasket required. There is an integrated seal that prevents leaking. Additionally, these pumps include the filler adapter. The 76TT pump also has an integrated gasket and does not require a paper gasket.Is it normal to have black marks on the wall after I use my finishing box? It only happens with the 10” box.
Regardless of the size of the finishing box, it sounds like your wheels may need to be lubricated. Apply a small amount of Bazooka oil to the wheels as part of your regular cleaning and maintenance to ensure that the wheels are turning smoothly.Is there a recommended height for the blades above the skids?
The blades on TapeTech Finishing Boxes (Flat, EasyClean® and Power Assist™), Corner Finishers and Nail Spotters are set to .005 inches (5/1000ths of an inch) above the skids or frames at the factory. You can use a simple feeler gauge to measure this precisely. In the field, your fingernail will also work as a good gauge. Depending on the age and condition of your tools and the various parts that work together to produce an edge-free finish, you may need to adjust your blades slightly higher than this factory this setting. You may also find that one side of the blade may need to be set differently than the other side due to the condition and wear of other parts. However, the blade should never be set less than .005 inches above the skids or frame.Is there a special cleaning adapter that can be used to clean the TapeTech Auto Taper, MudRunner® and Corner Applicators?
Keeping your Automatic Taping and Finishing tools clean is a key to proper operation and long tool life. An important part of cleaning the Automatic Tapers (04TT & 05TT), MudRunner® (14TT) and Corner Applicators (35TT & 50TT). TapeTech offers an EZ Clean Wash Adapter (#053808) that connects to hose nozzles that feature a threaded front end (e.g Gilmour 573TF). Just attach this adapter to your hose nozzle and then insert onto the filler adapter of the tools. Turn on the water, squeeze the trigger of the hose nozzle and quickly flush the joint compound out of the filler adapters of the tools without getting soaked! There are two adapters per package. These adapters, along with a hose nozzle, are also included as part of the 501B Taper Cleaning Kit and 501H1 Pump Cleaning Kit.My corner applicator is hard to operate. What’s the problem?
If your corner applicator is difficult to push it could be due to a few things. First, be sure that the tool is properly attached to the handle. The end of the HA handle has an “elbow”. This elbow should face away from you (toward the wall) when the tool is in use. Second, make sure the joint compound is properly mixed according to the manufacturer’s specifications. If the joint compound is too thick, it will be hard to push out of the corner applicator. Finally, the wiper on the edges of the pressure plate should be properly lubricated with Bazooka oil. A dry wiper will make it difficult to operate the corner applicator.My tape always seems to wrinkle when I use the corner roller. Am I doing something wrong or is something wrong with the roller?
Wrinkles usually happen if you start to roll your corners from one end of the corner to the other instead of from the middle. Try starting from the center and working towards each end first, then roll the entire length of the corner once the tape is embedded. If this doesn’t fix it, the problem could be with the roller. Check to be sure that the rollers are turning freely and that there is no dry joint compound preventing them from turning smoothly. This could cause the roller to “drag” the tape and create wrinkles.My TapeTech Loading Pump is leaking joint compound around the brass hex piece and the piston rod at the top of my pump. How can I repair this leak?
Generally, this leak occurs when the U-cup (part #700005) on the 76TT or 73TT pump is worn. The U-cup is a rubber seal that keeps the joint compound from leaking around the piston rod. To repair it, remove the brass gland and insert the U-cup. We recommend that that you insert a new bushing liner (#700029) at the same time as replacing the U-cup. TapeTech 501A is a convenient kit that contains all the necessary parts that you will need to make this repair.My TapeTech Loading Pump will not prime or pump joint compound.
If your TapeTech Loading Pump - 76TT, 72TT, 73TT, B74TT or B75TT - will not prime or pump the joint compound it is usually due to one of two possible causes. The first reason could be that the valve disc located just above the screen is blocked and cannot open to allow the joint compound to pass into the pump cylinder. The other reason is that debris or dried joint compound has collected in the foot valve screen and is blocking the flow of joint compound. The best way to fix this issue is to spray water directly into the screen/foot valve to loosen and remove any material. If pressured water is not available, try placing the loading pump into a bucket of clean water, and pump water through the pump until it will prime. Drain the water and place the loading pump back into the bucket of joint compound and then prime with joint compound. TapeTech offers a convenient maintenance kit, 501H1, to help you keep your loading pumps in the best working condition.The part that holds the advance needle keeps getting stuck at the top of the tape guide. How do I stop this from happening?
The Gooser Needle (the small needle that advances the tape) is attached to a white plastic tube called the Gooser Guide( part #054111F). If the Gooser Guide is getting stuck at the top of the Tape Guide, this area probably needs to be lubricated. Make sure to keep this area clean and free of dried joint compound and use Ames Bazooka Oil to keep the moving parts lubricated. Smooth operation of the Gooser Guide piece will ensure easy cutting and advancement of the tape. View the Schematic Drawings for the Automatic TapersWhat is the recommended type of extension cord that I should use with the Bazooka Continuous Flow Pump?
The required extension cord for the CTPMP Bazooka Continuous Flow Pump is a 12 gauge, 3-wire extension cord. The cord should not exceed 250’ (76 meters) in length. Please refer to the Operations Guide for additional information.What makes the B74TT BAZOOKA pump work so fast?
The B74TT BAZOOKA pump fills tools up to 40% faster than standard pumps through two features: an increased tube diameter allows more joint compound into the pump and the adjustable handle can be set to provide more leverage and increased “pull” with each stroke.What sizes do you offer in these Premium Finishing Knives?
We offer eight (8) different sizes - 7", 10", 14", 18", 24", 32", 40" and 48" - plus an optional Universal Extension Handle that fits all sizes.What sizes of drywall joint tape can I use with my Bazooka automatic taper?
The TapeTech Automatic Tapers (07TT, 04TT and 05TT) and the T05CF Bazooka Continuous Flow Taper both accept 250’ and 500’ (76.2 m and 152.4 m) paper and fiber tape rolls that measure 2 1/16” to 2 1/8” (52.39 mm to 53.96 mm) wide. Fiberglass screen or mesh adhesive tape will not work in the Automatic Tapers or the Bazooka Continuous Flow Tapers.What’s the best method to finish butt joints with TapeTech finishing boxes?
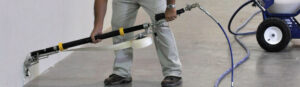
Finishing butt joints in drywall is one of the most challenging parts of the overall drywall finishing process. There are a few different methods of finishing butt joints using automatic taping and finishing tools. Naturally, you will first tape the joint using the automatic taper (07TT, 04TT or 05TT). The technique for finishing the joint with the finishing box will depend on the size of the finishing boxes that you use. If you use a 7” (175mm) finishing box for the first (embedding) coat, run the finishing box down the center of the drywall butt joint with the crown adjustment set to zero (0). Then make an additional pass on both sides of this joint. After this joint compound dries, make another pass down either side of the taped and boxed joint, skipping the center of the butt joint. The joint is now embedded. For the finishing coat (2nd application) and skim coat (3rd application), you’ll repeat these same steps using a 10” (250mm) or 12” (300mm) finishing box, respectively, and setting the crown adjustment to 2 or 3. Again, first run down the center of the joint and then make a pass on either side. Allow the joint compound to dry and make a pass down both sides of the joint, skipping the center of the joint again. If you like to use a 10” (250mm) finishing box for the embedding coat, run the box on both sides of the taped butt joint with the crown adjustment set to zero (0). After the joint compound has dried, run the 10” (250mm) finishing box down the center of the taped joint; the drywall butt joint is now embedded. Repeat these same steps with the 12” (300mm) finishing box for the finishing coat and skim coat with the crown adjustment set to 2 or 3. Depending on the butt joint and the framing behind it, you may still need to do some wipe down with a joint knife when embedding and finishing butt joints with finishing boxes. Try to keep manual wipe down to a minimum to ensure a good finish. These techniques are the same whether you use TapeTech EasyClean™ boxes or Power Assist™ finishing boxes.What’s the maximum length of hose you can use with the Continuous Flow?
The BAZOOKA Continuous Flow system is designed for optimal operation with up to 150’ of ½” hose plus 15’ of ¼” whip hose.What’s the part number for the screen in the bottom of my pump?
If you are using either the 72TT or 73TT pump, the fine mesh screen is part number 700032F and the coarse mesh screen is 700033F. If you own the B74TT Bazooka pump, the fine mesh screen is part number 740032 and the coarse mesh screen is 70033.When I am filling my TapeTech Finishing Boxes, the Filler Tube keeps falling out as I use the loading pump. Can you please advise how I can keep this from occurring?
It sounds like you’ve been doing a lot of work and the “O” Ring that is inside the 90T Filler Adapter is worn out. This “O” Ring holds the Filler Tube securely inside the Filler Adapter while you’re filling ATF tools with the 72TT loading pump. The good news is it’s easy to fix this issue! Simply remove the “O” Ring and replace it with a new one (part #709034). Be sure to thoroughly clean the area that this “O” ring is seated in to ensure proper installation.When I am taping ceilings with my Bazooka, mud is coming out on both sides of the tape and falling to the floor. Why is this happening?
When taping ceilings with the TapeTech Automatic Taper, use both drive wheels for the first 4” to 6” (101mm to 127mm) then engage the creaser wheel to secure the tape and tilt the bottom of the automatic taper at a slight angle, leaving only one drive wheel in contact with the drywall surface. Move the Taper (07TT, 04TT or 05TT) along the drywall joint with the taper head leading the way as you tape the ceiling joints. This method ensures the proper amount of joint compound is applied to the joint and that the tape adheres to it until you wipe it down with the taping knife.When I am using my automatic taper, why does the tape cut at an angle instead of square?
This usually happens if you cut the tape when you are still running the taper. This is because you are naturally running the taper at a slight angle to wall. Be sure to stop running the taper before pulling back on the control tube to cut the tape. When you stop running the taper, your natural motion usually makes the taper more square to the wall, resulting in a better cut.When I change the blades in my TapeTech Finishing Boxes, sometimes they do not remain fully seated into the brass blade carrier. How can I keep this from occurring?
Here’s a trick from the Expert: When installing a replacement blade into the TapeTech Flat, EasyClean™ or Power Assist™ finishing boxes, (or any finishing boxes) if you pinch the blade between your thumb and fore finger about 2” from each end of the blade and bend it very slightly, the blade will seat more securely in the holder. To find the right replacement blades for your model of TapeTech finishing box, please reference the Schematics page for your box.When I use my MudRunner®, why does the joint compound flow out very slowly?
Your joint compound mix is probably too thick. Try mixing more water into your compound. Generally, about 28 to 30 oz. of water per 5 gallons is the right mix. The rubber wiper inside of the material cylinder may also need to be lubricated with Ames Bazooka Oil. This wiper will sometimes become dry and slows the movement of the piston that pushes the joint compound. This will keep your MudRunner working effortlessly.When I use my TapeTech Bazooka, the tape advance needle keeps ripping the drywall joint tape. How can I prevent this?
If the needle (part #059049, often referred to as the gooser needle) that advances the drywall joint tape is ripping the tape when you use your TapeTech automatic taper, it is usually a sign that the taper needs cleaning or routine maintenance. First, check the needle; if it is worn it may need to be replaced. Make sure the needle is properly set in the needle holder (050050F) and adjust, if necessary. Check to see that the drywall joint tape moves smoothly through the tape guide assembly (054101) and clean the assembly, if needed. For your convenience, TapeTech offers Maintenance Kit 200 which includes the gooser needle and nine others parts already combined into one, easy sub-assembly.When should you use the straight box handle and when should you use the bent handle?
The type of box handle you use is really a personal preference. However, the TapeTech EasyFinish® bent handles do offer a significant benefit if you finish a lot of flat or butt drywall joints over shoulder height. The bent handle provides natural leverage that makes depressing the pressure plate of the finishing box easier. If you stand your drywall vertically, the EasyFinish® handles can really help reduce the effort required as part of the drywall finishing process. Additionally, if you use Power Assist® finishing boxes, the bent handles actually help to engage and disengage the Power Assist mechanism.When taping with automatic taping tools, is there a specific order I should follow?
While everyone has their own preference in the order that they tape a room, most automatic tool users will tape all the drywall butt joints (where two non-tapered edges of drywall meet) on the walls and ceilings first as they move around the job. These butt joints are wiped down with a taping knife and pan to press the tape into the joint compound and remove the excess mud. After the butt joints are taped and wiped down, all the flat joints (where two tapered edges of drywall meet) on the walls and ceilings are taped. Like the butt joints, the flat joints are wiped down with a taping knife and pan to press the tape into the joint compound and remove the excess mud. The final step is to tape the internal corners with the Automatic Taper, immediately followed by using the Corner Roller and Corner Finisher to produce a machine finished corner that is already embedded on both sides.Where can I buy these Premium Finishing Knives?
Any of our Authorized TapeTech Dealers can order these knives for you. To locate a dealer near you, please visit our Dealer Locator.Where can I purchase Semi-Automatic Tools?
You can purchase Semi-Automatic Tools through any of our authorized TapeTech dealers. To locate the nearest dealer, visit our Dealer Locator.Where should the crown level be set on my finishing boxes?
There are a lot of variables when finishing drywall, including how straight and flat the wall is, the quality of the drywall installation, the thickness of the wallboard and the associated recess of the tapered joint. Generally speaking, the crown for the finishing boxes is usually set at 0 or 1 for the first coat. This provides the maximum amount of crown and effectively fills in the joint. For the second application, or topping coat, set the crown to 3 or 4. This reduces the crown and fills in any remaining recesses from the first application. If you apply a third coat, such as in Level 5 finishes, set the crown to 5, the least amount of crown. This guideline works for TapeTech Flat, EasyClean® or Power Assist® finishing boxes.Which Premium Finishing Knife works best with the automatic taper?
The 7" knife works best for wiping tape that is applied with the automatic taper. Use the optional extension handle (sold separately) when wiping ceiling joints which avoids the need for stilts or scaffolding.Which Premium Finishing Knife works best with the automatic taper?
The 7" knife works best for wiping tape that is applied with the automatic taper. Use the optional extension handle (sold separately) when wiping ceiling joints which avoids the need for stilts or scaffolding.Which Training is Right for Your Company?
Here are some factors to consider when deciding which training method suits your company best.
Training at our National Training Facility in Georgia is recommended if:
- You need to train less than four employees, or
- Your company is located within driving distance to our Training Facility
Training at your location is recommended if:
- You need to train between 4 and 15 employees, or
- It’s important to keep your employees working on your jobs without travel interruptions, or
- You are not able to attend one of our scheduled training classes, or
- Your company is located outside the United States.